Friday, August 30, 2013

Planning for Celisticon 2013 - Big Jim's Narrative Event


I think I've gotten my list squared away for Big Jim's Narrative Event at Celisticon this weekend.  This is my fourth time playing in his events and I am super excited.  They have all been a blast.  The last one I played in at the BAO earlier this year was the first time I really used Ralph (my Chaos Warhound Titan) and last year's Celisticon was the game was when I faced a Warhound on the table and decided I had to have one (no regrets).

Yesterday I started working on my army list and looking at the scenario, troops are going to be very important.  My army list starts with subtracting out the points for Raph, leaving me with 1380 for the list.

Besides Ralph I have take my huge unit of Zombies which means Typhus is coming along for the ride. The zombies always go in my figure case one because they are of my favorite units I have ever built, being a kitbash of several GW kits.  I want two units of plague marines for grabbing objectives.  With the remaining points I decided to go with a Demon Prince and a unit of Terminators.  Once again,  I decided to bring these models since I like them.  As my chaos isn't the most competitive army out there (the heldrakes are staying home), I wanted to bring the models I wanted to look at, outside of my display case.  I did contemplate brining the Decimator instead of the Demon Prince but as I haven't used the Demon Prince in a while I think I'd like to see him on the table.

My List

HQ
  • Typhus
  • Demon Prince (Nurgle, Wings, Psyker)
Elite
  • 5 Nurgle Terminators
 Troops
  • 30 Plague Zombies
  • 6 Plaguemarines (Rhino, 2 plasma guns)
  • 6 Plaguemarines (Rhino, 2 plasma guns)
Super Heavy
  • Chaos Warhound Titan
Another benefit to this list is that I won't have to bring a ton of stuff. While I am hamstringing myself with no helldrakes or maulerfiends this army will be pretty easy to transport.  Since I am bringing some terrain for the event I wanted an easy to transport list so I don't have a ton of stuff to carry.

Monday, August 19, 2013

Tau Riptides with MaskFX digital camo masking

I spent some time this weekend getting the camo scheme down on two of my Tau Riptides.  The MaskFX digital camo masking worked about as well as it did before.  It seems to really not like curved surfaces.  I experimented a bit with using multiple pieces to hold itself down, and I was somewhat successful.

I think I am going to use some foam to ding up the camo even more so the over spray doesn't show up so prominently.   It's a great product when it works, I am just having way too much trouble getting it to stay put. 

Just like my earlier post you can see how some of the masking has already pealed up after putting it down on the rest of the model.  I ended up just accepting it on these models and I'm going to weather them to cover it up.


After spraying the base coat and then masking.  Masking took around 40 minutes since I used so many pieces.


 After spraying the second coat, the more prominent color, on top.


Peeling off the masking.  I use a combination of my hobby knife and tweezers, depending on the location and how it is sticking.


After peeling off the masking I was left with the below.


I then proceeded to repeat the process on my second riptide.  The project ended up taking most of a morning and an afternoon. 


After finishing spraying I started on the second step, adding Nuln Oil shade ( with some flo-aid) to the cracks to begin the laborious lining process.  It is such a pain but it really does make the model pop.


Wednesday, August 7, 2013

Review of Critical Mass Games MaskFX Digital Camouflage Masking Sheets

I decided to do an urban camouflage scheme with my Tau, and after a while of trying to decided how to do the camo I decided on using a masking technique.  I've done this in the past on a large scale, with a baneblade and shadowsword, though this is my first time masking infantry.

After a while of looking into my options I found a product by Critical Mass Games called "MaskFX".  They are precut sheets of masking, in a digital pattern.  They even make a "15mm" sheet, which I thought would be perfect for Infantry figures.

The company is based out of England, though their shipping was very fast and the website was easy to order through as a US customer.  The website isn't really clear on how much masking is on each sheet, or how much to buy, so I picked up two "28mm" sized sheets and two "15mm" sized sheets.  My logic was I could the smaller scale sheets for my infantry and the larger sized masking for my vehicles and larger suits.  My first disappointment was when the masking sheets arrived.  The two "scales" are the exact same size of masking, only the "28mm" sheet holds more masking.  Not a big deal, but just a bit of a let down.

I decided to try the masking out on some Crisis Suits and a Suit Commander. I used three different greys from GW for this process.  I used Administratum Grey as the base coat.  Put down some masking, and then Dawnstone.  This was where I started having my first issues.  The MaskFX adhesive isn't that great, so the masking has a tendency to pull away from the model if it's wrapped around anything, or not on a flat surface.  While it is good that the masking isn't too strong so it doesn't pull paint off it doesn't do a great job of staying put. After my second spray I did some more masking and sprayed the models with Mechanicus Standard Grey, my final coat.  This would give me three different colors on the models.    For pulling the masking off I highly recommend using some tweezers.  The masking is small and hard to pull with just a hobby knife.

Below are the results I got.  Unfortunately, since the masking doesn't stay down as well as it should, some of the masking is not as clean as you may want.  Since I am doing "dirty" camo, and will go back and put chips in, it will look okay for me.  If you are picking about it, you may want to avoid using this product. 


After completing the suits and being relatively happy, except for the "not sticking well" problem, I decided to move on to my infantry.  Since the infantry (fire warriors and pathfinders) are smaller then the suits I decided to do only two colors, Administratum Grey masked off and sprayed with Mechanicus Standard Grey.  This would have the most "striking: pattern, save me a masking step, and really not lose much.

Since I was only doing one masking I decided to do more masking so the camo would be more pronounced.  Since the masking has issue on curves and "non-flat" areas I also decided to do every helmet, shoulder pad, and gun heavily.  I think this will show up on the table top and you won't notice the legs and torso's don't have much masking on them. 


It takes a long time to mask, about two and a half hours to do 46 infantry models.  I may just be slow though.  What this does mean is that by the time you are ready to spray a lot of the masking would peel up and not be sticking to the model.  You can see below that before I sprayed each model, I had to press down on the masking to get it back in place.  I was reasonably successful in getting the masking where I wanted.


 After spraying.


I was reasonably successful in getting masking back to where it needed to be before spraying, though once again, some of the masking is not as clean as I would have liked. Since I don't mind a dirtier look to the camo, it is not the end of the world, though it is a bit frustrating the product doesn't work as well as I think it should. The Infantry had more issues then the Crisis suits, you can clearly see in the below picture how many of the lines were not clean between the colors.


The models so far I've done using the MaskFX digital camouflage masking.


Overall I'd give the product a B+.  I am going to use it to finish this army, I do really like the look it can provide.  I wish the tackiness of the masking was about 20% more so it would stick once you lay it down. It is a balancing act with any masking material as you don't want too much adhesive or you start to pull the paint off when you pull the masking, this just needs a touch more.  I also would hope the website would get updated to clearly define a bit better what you are getting when you buy it.

Tuesday, July 23, 2013

Assembling a Forgeworld AX-1-0 Tigershark

While working on my current Tau project I am in tandem working on an Apocalypse model for the army.  I really enjoyed having the Baneblade and Shadowsword for my IG army, the titan for my Chaos, so when I decided to do Tau I knew I wanted at least one Apocalypse model to run with it. I decided on the AX-1-0 Tigershark since D-Weapons are awesome. 

This model turned out to look really easy but be more of a pain than I thought it would be.  For one thing, the mold channels go into areas that are exposed flat areas of the back of the craft so a ton of filing needs to be done so it looks right.  They also were a pain to cut off since they were so think.  A dremel works but it makes a big mess (even using a vacuum). 

As I mentioned a few weeks ago (and detailed in this post) I mounted the model using a Secret Weapon Miniatures base and flying stand. After that was done I began the assembly process.  I spent a few hours every few days over about two weeks.  It wasn't the hardest project I've done though it turned out to be more intensive than I thought looking at the pieces.

The first thing to do was to start filing down the model so the engines could fit on the back.  As you can see from the below picture quite a bit of file work was needed to make the housings and four engines fit. 


 A clamp was super helpful to ensure that the housing sat flush with the not exactly flat surface I filed down.


 After a lot of dry fitting and filing I was able to get all four engines and their mounts installed. 


 Like all Forgeworld models some of the pieces were warped.  For this model it wasn't too bad, it really was only the Railguns.  Some hot water got them most of the way there.


 I did run into one major problem.   While attempting to install the cockpit/escape pod, which slides into place, it got stuck about halfway into position.  I am still not sure how this happened after many dry fittings.  It is much better to slide it into place and then put a couple of  drops into the cracks to glue in place than put glue on it before sliding.

I tried to use a mallet to gently push the assembly back out but this ended up just damaging the back of the cockpit assembly.  Luckily this part will end up being covered, though it was hugely frustrating, to say the least.  After realizing it wouldn't budge I figured an overnight soak in Simple Green would be the only way to get it out, by breaking up the glue.  I didn't want to redo the entire model, so I managed to MacGyver a setup that only soaked the needed area. Sure enough, after about 24 hours, with a little prying, it popped right out and I could get back to assembly.


 I only had a few pieces to install and the model is basically done.  The rail guns are just sitting in place, since I'd like to pain them separately (otherwise I can't get camo masking on the inner engine housings.


Tuesday, July 16, 2013

First 2nd Edition Apocalypse game under my belt

I packed up my Nurgle themed Chaos Space Marine army, with Ralph the Warhound, to take down to my local Games Workshop store and get in a game of the new Apocalypse.  There are tons of articles in the 40k blogosphere reviewing Apocalypse so this is not what this post be about.

 I will only say that I had fun and I really enjoy the direction GW is going with Apocalypse.  It feels like a continuation of the move in 6th edition to a more narrative, garage-hammer style game.  While in the past I was more into the competitive when 6th rolled around I was pretty much done with competing in the hobby so this move is working out really well for my hobby.

We played a game of around 3500-4000 points with some super heavies.  I had a Titan and my opponent had the new Khorne super heavy as well as a tower thing on top of a Baneblade.  I can't remember exactly what it was, but it sure did pump out some pain.  So many weapons.


Like most games I didn't take a ton of pictures, though I did get some.  My army wasn't all the way painted so I wasn't crazy about the pictures that did come out.

My deployment. Ralph took the left side and my Riptide formation (4 strong, thanks to the GW store manager letting me borrow one of his) took the right flank.


My opponent got first turn and I already had some demons in my face. 


I manged to put enough shots down that the demon unit and his demon prince friend got scooped.  This was a portent of things to come as Tau and Chaos are a such a potent combo.  Between the hell drakes and crisis suits they didn't last long.

 After my first turn more deep strikers came in.  This time Lord Zufor and a full Terminator retinue deep struck right in my lines.  I knew this would be crazy and devoted about half my army to dealing with it.  I got really lucky in that 3 of my 4 riptides passed reactor overcharge checks and I could an overcharged ion cannon pie plate on them.  A very lucky hit, followed with many marker light assisted shot brought the unit down and then Zufor bit it.  It was one of those turns where I got very lucky and I shouldn't have been able to handle them.

 The Demon Princes on my right flank (left screen) came deep striking in and since my left flank was clear my whole army could shoot at them.  I had a lot of lucky wounds and my opponent couldn't make hardly any invulnerable saves.

The game went on for another turn though it was mostly a one sided game.  It was a game where it wasn't a great match up for my opponent, playing a mostly assault army, and he got really unlucky in a lot of his rolls and I rolled hot equaled a very one sided game. He was a fantastic sport, made the best of it, and I think had a good time.


 Bonus pics time.

Found out if you knock Ralph over just right he looks like he is napping.


I got to see both the Khorne and Necron super heavy in person.  I'm still not sold on the Khorne model though the Necron one is insane.  Almost makes me want to play Necrons so I can field one. 


The store had an Apocalypse demo table.  Fantastic idea, and it looked fantastic. 


Monday, July 15, 2013

Third Riptide posed and done

I decided I would pick up another Riptide so I could use the formation in Apocalypse games.  With the updated rules being released I am assuming it will be easier to find games and I should take advantage of doing at least one formation.  The Riptide formation, unlike a lot of Apocalypse, only requires 3 models, a very reasonably sized unit. 

Since I had done my first and second as a rather aggressive and defense poses, I decided to do something in the middle.  I thought it would be a great chance to do something more scenic, and maybe even a Riptide crouching.  It came out reasonably the way I wanted it, though due to the nature of the legs you can only compress them so much.  Overall I got some great feedback and I am happy, which is the most important part.

I started off by building a square building, laying on it's side, so the Riptide would have something to stand on.


 I then added some additional parts to the building for character and mounted the legs.
 Continuing the pose, I decided to try and make it look as if the Riptide has just jumped onto the debris, and is balancing itself to move again.


The finished model.  It came out taller than a normal riptide, though only by a few inches. 


All three Riptides, hanging out like a boy band.

Bonus picture.  Three Crisis suits I hacked up their legs and arms to repose.


Wednesday, July 3, 2013

Mounting a Secret Weapon flying base on a Forgeworld Tigershark

Part of my current Tau project is an AX-10 Tigershark model.  Having built a warhound last year I knew this was going to be a long project and while I haven't even finished my Tau I wanted to get a jump start so I can get do this model in stages.

After cleaning up the model I decided on how to mount it.  Since I don't play much 40k I wanted to use the landing gear and make it more of display model.  I do want to play with it occasionally, that being said, I decided on a Secret Weapon Miniatures base from the Tau Ceti line with their "5" flight widget". .  While the rest of my army will be on standard bases I thought it could be interesting to use it for this Apocalypse only model.

This required some work to mount.  The base comes drilled for the flying stand by Secret Weapon Miniatures.  That is one half of the equation, as you have to drill out the bottom of the model.  The flying widget comes with a mount though this is a very heavy model and I had doubts it would support a large resin model.  I am sure it would have worked fine for a plastic GW kit though.

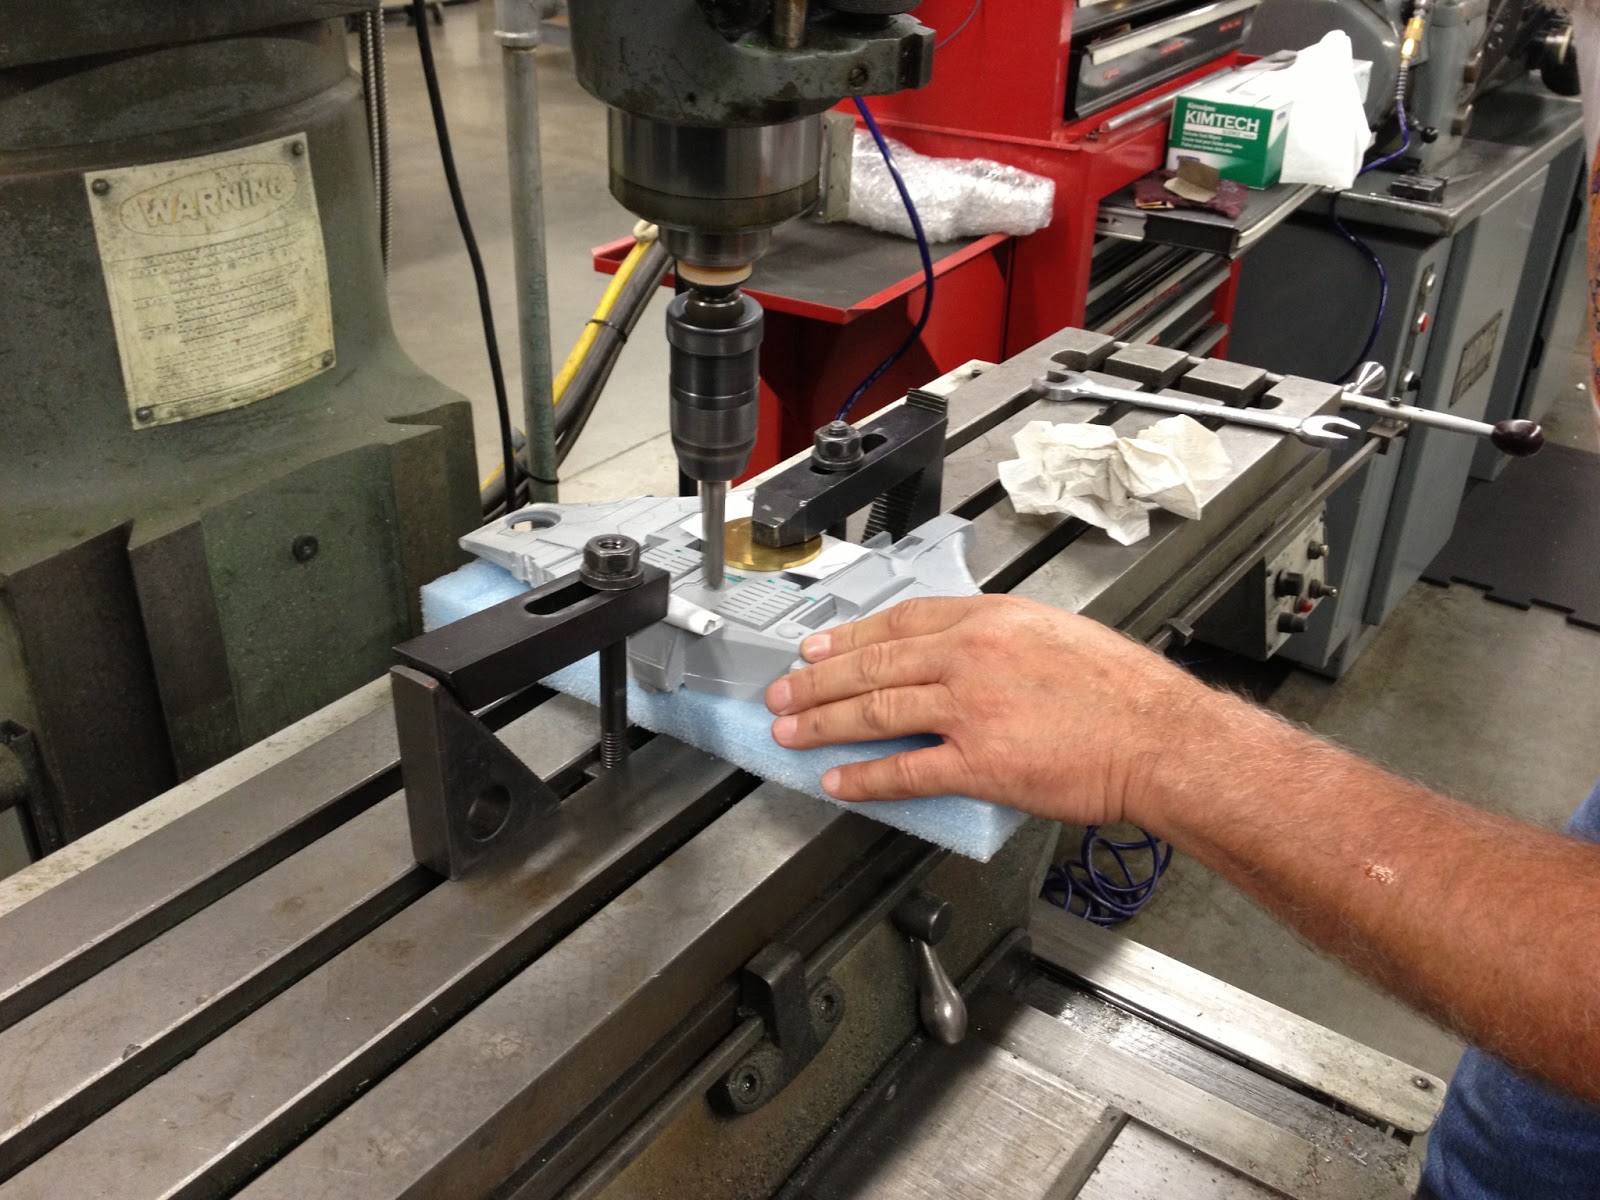
Additional, I  didn't want a static mount, I wanted it to be climbing and banking.  I am very lucky in that while I work in an office in my day job, it is in manufacturing and the the machine shop supervisor will frequently indulge me with help on hobby projects.  He previously had helped with with machining out some Chimeras for an IG project.

The first step was to decide how much bank and climb (degrees to drill at).  The advantage of doing it with this machine was it could be done at 5 degrees back and 5 degrees to the side.

 Fixtures were put in place to make sure the Tigershark body stayed in place.
 A large bit was used that was just smaller than the ultimate size we were looking for.
 Starting to drill.

After drilling the first bit, it was exchanged for one the correct size.  This ensured that the hole was exactly fitted to the correct size to hold the flying stem snugly. 
 The finished model on the base, from the front.
 From the back.
The hole.  You can see some of the markings I made so the mounting wouldn't interfere with the finished model.
I could have gone a bit more aggressive I think we the degree of angle for drilling though with such a large model I didn't want to risk having a tipping problem. 

Now I need to actually finish the thing.