Tuesday, July 23, 2013

Assembling a Forgeworld AX-1-0 Tigershark

While working on my current Tau project I am in tandem working on an Apocalypse model for the army.  I really enjoyed having the Baneblade and Shadowsword for my IG army, the titan for my Chaos, so when I decided to do Tau I knew I wanted at least one Apocalypse model to run with it. I decided on the AX-1-0 Tigershark since D-Weapons are awesome. 

This model turned out to look really easy but be more of a pain than I thought it would be.  For one thing, the mold channels go into areas that are exposed flat areas of the back of the craft so a ton of filing needs to be done so it looks right.  They also were a pain to cut off since they were so think.  A dremel works but it makes a big mess (even using a vacuum). 

As I mentioned a few weeks ago (and detailed in this post) I mounted the model using a Secret Weapon Miniatures base and flying stand. After that was done I began the assembly process.  I spent a few hours every few days over about two weeks.  It wasn't the hardest project I've done though it turned out to be more intensive than I thought looking at the pieces.

The first thing to do was to start filing down the model so the engines could fit on the back.  As you can see from the below picture quite a bit of file work was needed to make the housings and four engines fit. 


 A clamp was super helpful to ensure that the housing sat flush with the not exactly flat surface I filed down.


 After a lot of dry fitting and filing I was able to get all four engines and their mounts installed. 


 Like all Forgeworld models some of the pieces were warped.  For this model it wasn't too bad, it really was only the Railguns.  Some hot water got them most of the way there.


 I did run into one major problem.   While attempting to install the cockpit/escape pod, which slides into place, it got stuck about halfway into position.  I am still not sure how this happened after many dry fittings.  It is much better to slide it into place and then put a couple of  drops into the cracks to glue in place than put glue on it before sliding.

I tried to use a mallet to gently push the assembly back out but this ended up just damaging the back of the cockpit assembly.  Luckily this part will end up being covered, though it was hugely frustrating, to say the least.  After realizing it wouldn't budge I figured an overnight soak in Simple Green would be the only way to get it out, by breaking up the glue.  I didn't want to redo the entire model, so I managed to MacGyver a setup that only soaked the needed area. Sure enough, after about 24 hours, with a little prying, it popped right out and I could get back to assembly.


 I only had a few pieces to install and the model is basically done.  The rail guns are just sitting in place, since I'd like to pain them separately (otherwise I can't get camo masking on the inner engine housings.


Tuesday, July 16, 2013

First 2nd Edition Apocalypse game under my belt

I packed up my Nurgle themed Chaos Space Marine army, with Ralph the Warhound, to take down to my local Games Workshop store and get in a game of the new Apocalypse.  There are tons of articles in the 40k blogosphere reviewing Apocalypse so this is not what this post be about.

 I will only say that I had fun and I really enjoy the direction GW is going with Apocalypse.  It feels like a continuation of the move in 6th edition to a more narrative, garage-hammer style game.  While in the past I was more into the competitive when 6th rolled around I was pretty much done with competing in the hobby so this move is working out really well for my hobby.

We played a game of around 3500-4000 points with some super heavies.  I had a Titan and my opponent had the new Khorne super heavy as well as a tower thing on top of a Baneblade.  I can't remember exactly what it was, but it sure did pump out some pain.  So many weapons.


Like most games I didn't take a ton of pictures, though I did get some.  My army wasn't all the way painted so I wasn't crazy about the pictures that did come out.

My deployment. Ralph took the left side and my Riptide formation (4 strong, thanks to the GW store manager letting me borrow one of his) took the right flank.


My opponent got first turn and I already had some demons in my face. 


I manged to put enough shots down that the demon unit and his demon prince friend got scooped.  This was a portent of things to come as Tau and Chaos are a such a potent combo.  Between the hell drakes and crisis suits they didn't last long.

 After my first turn more deep strikers came in.  This time Lord Zufor and a full Terminator retinue deep struck right in my lines.  I knew this would be crazy and devoted about half my army to dealing with it.  I got really lucky in that 3 of my 4 riptides passed reactor overcharge checks and I could an overcharged ion cannon pie plate on them.  A very lucky hit, followed with many marker light assisted shot brought the unit down and then Zufor bit it.  It was one of those turns where I got very lucky and I shouldn't have been able to handle them.

 The Demon Princes on my right flank (left screen) came deep striking in and since my left flank was clear my whole army could shoot at them.  I had a lot of lucky wounds and my opponent couldn't make hardly any invulnerable saves.

The game went on for another turn though it was mostly a one sided game.  It was a game where it wasn't a great match up for my opponent, playing a mostly assault army, and he got really unlucky in a lot of his rolls and I rolled hot equaled a very one sided game. He was a fantastic sport, made the best of it, and I think had a good time.


 Bonus pics time.

Found out if you knock Ralph over just right he looks like he is napping.


I got to see both the Khorne and Necron super heavy in person.  I'm still not sold on the Khorne model though the Necron one is insane.  Almost makes me want to play Necrons so I can field one. 


The store had an Apocalypse demo table.  Fantastic idea, and it looked fantastic. 


Monday, July 15, 2013

Third Riptide posed and done

I decided I would pick up another Riptide so I could use the formation in Apocalypse games.  With the updated rules being released I am assuming it will be easier to find games and I should take advantage of doing at least one formation.  The Riptide formation, unlike a lot of Apocalypse, only requires 3 models, a very reasonably sized unit. 

Since I had done my first and second as a rather aggressive and defense poses, I decided to do something in the middle.  I thought it would be a great chance to do something more scenic, and maybe even a Riptide crouching.  It came out reasonably the way I wanted it, though due to the nature of the legs you can only compress them so much.  Overall I got some great feedback and I am happy, which is the most important part.

I started off by building a square building, laying on it's side, so the Riptide would have something to stand on.


 I then added some additional parts to the building for character and mounted the legs.
 Continuing the pose, I decided to try and make it look as if the Riptide has just jumped onto the debris, and is balancing itself to move again.


The finished model.  It came out taller than a normal riptide, though only by a few inches. 


All three Riptides, hanging out like a boy band.

Bonus picture.  Three Crisis suits I hacked up their legs and arms to repose.


Wednesday, July 3, 2013

Mounting a Secret Weapon flying base on a Forgeworld Tigershark

Part of my current Tau project is an AX-10 Tigershark model.  Having built a warhound last year I knew this was going to be a long project and while I haven't even finished my Tau I wanted to get a jump start so I can get do this model in stages.

After cleaning up the model I decided on how to mount it.  Since I don't play much 40k I wanted to use the landing gear and make it more of display model.  I do want to play with it occasionally, that being said, I decided on a Secret Weapon Miniatures base from the Tau Ceti line with their "5" flight widget". .  While the rest of my army will be on standard bases I thought it could be interesting to use it for this Apocalypse only model.

This required some work to mount.  The base comes drilled for the flying stand by Secret Weapon Miniatures.  That is one half of the equation, as you have to drill out the bottom of the model.  The flying widget comes with a mount though this is a very heavy model and I had doubts it would support a large resin model.  I am sure it would have worked fine for a plastic GW kit though.

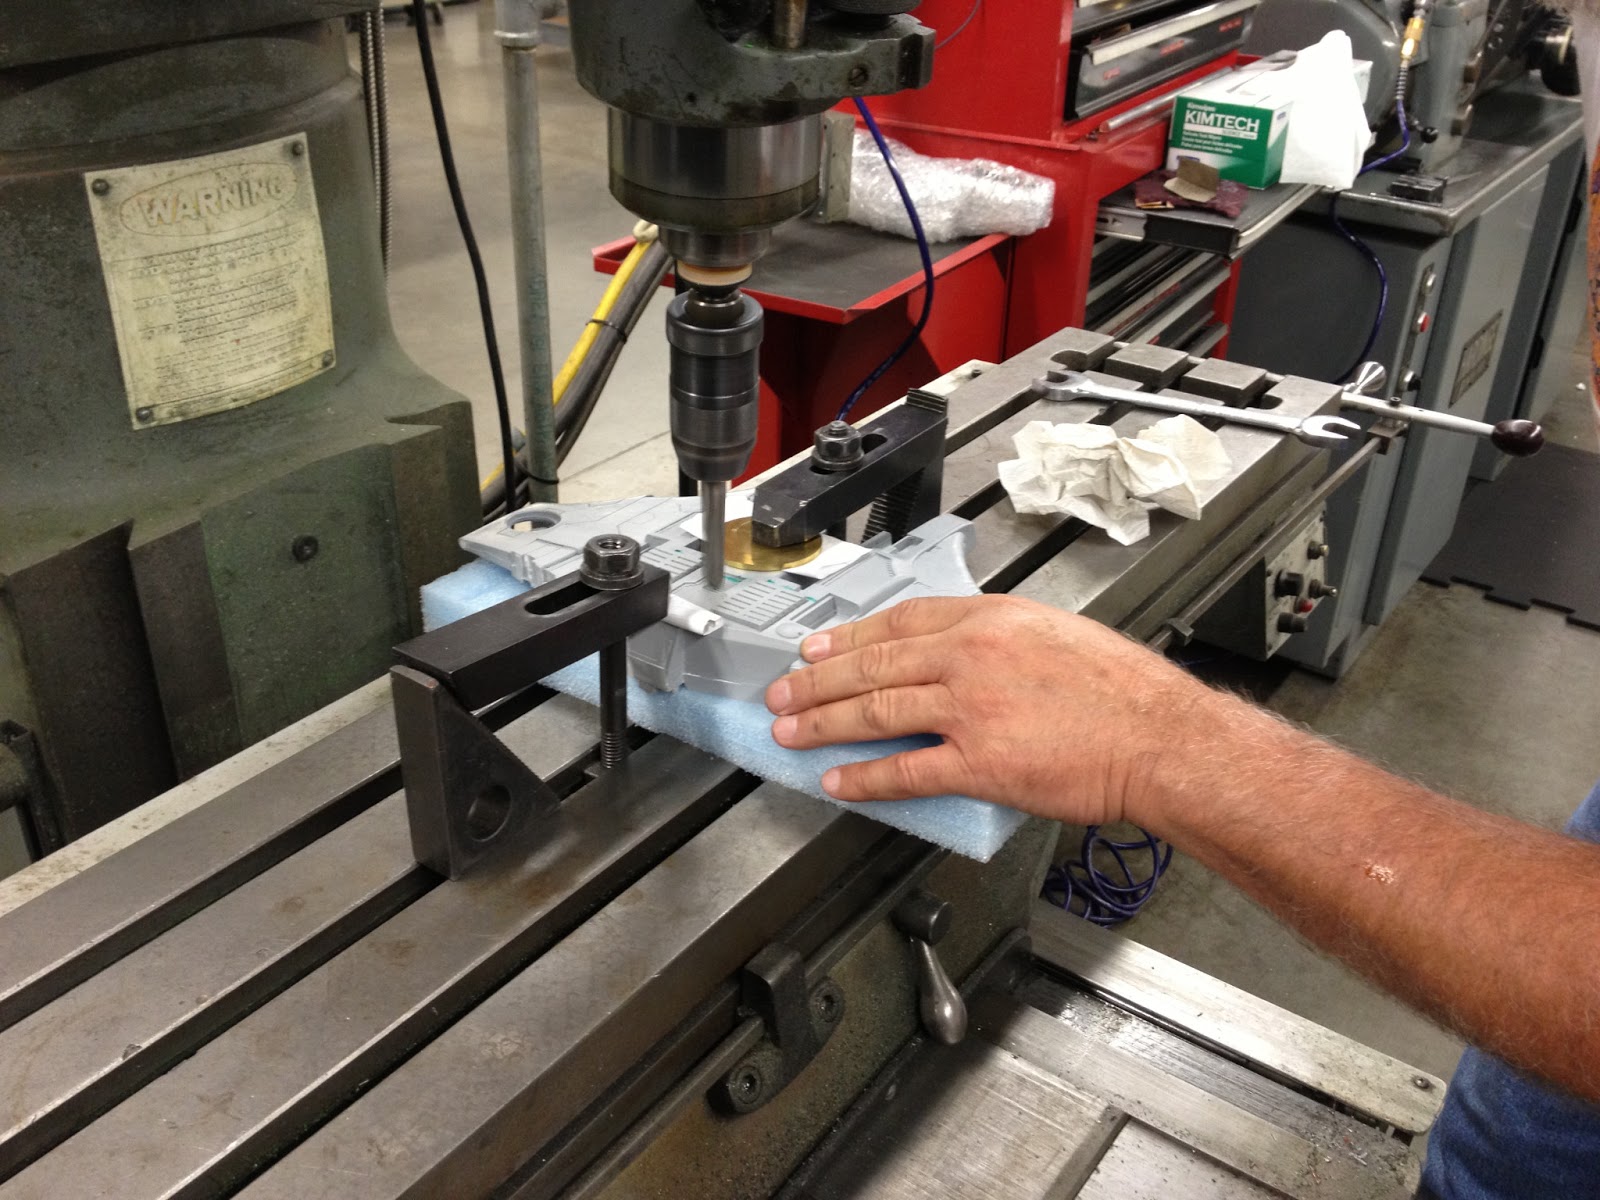
Additional, I  didn't want a static mount, I wanted it to be climbing and banking.  I am very lucky in that while I work in an office in my day job, it is in manufacturing and the the machine shop supervisor will frequently indulge me with help on hobby projects.  He previously had helped with with machining out some Chimeras for an IG project.

The first step was to decide how much bank and climb (degrees to drill at).  The advantage of doing it with this machine was it could be done at 5 degrees back and 5 degrees to the side.

 Fixtures were put in place to make sure the Tigershark body stayed in place.
 A large bit was used that was just smaller than the ultimate size we were looking for.
 Starting to drill.

After drilling the first bit, it was exchanged for one the correct size.  This ensured that the hole was exactly fitted to the correct size to hold the flying stem snugly. 
 The finished model on the base, from the front.
 From the back.
The hole.  You can see some of the markings I made so the mounting wouldn't interfere with the finished model.
I could have gone a bit more aggressive I think we the degree of angle for drilling though with such a large model I didn't want to risk having a tipping problem. 

Now I need to actually finish the thing.

Monday, June 17, 2013

Building two Tau Riptides - Now with more poseability

I finally cracked open some of the Tau kits I had sitting on my shelves.  I decided to get started on this project with the two models I most wanted to build, the Riptides.  I had heard the models were easy to pose in any stance you wanted and that was a bit of an understatement.  If you clip the pre positioned pegs an experienced (and daring) modeler can make these guys have just about any pose you want.

Since I had two, I decided to do two different poses.  One of them is more aggressive, and one is a more defensive pose.  I'm a bit concerned the defensive one has a bit of a"talk to the hand" look, but I'm still happy with it and going to leave it as is.

I would suggest to anyone building this model ignore the GW instructions.  They tell you to  build a leg as a whole piece and then stick it into the crotch sub assembly as well as the other leg.  You can't do any posing.  I suggest building the model into sub assemblies before picking your pose.  Unless you want the GW standard pose you have to build this thing in pieces.

I still need to build the rest of the army and get some play testing in before I have to pick a scheme though I am leaning towards a Night Operations scheme from the 2nd edition Imperial Armour 3 book.  I think it will great and I am looking to try doing some more advanced camouflage methods using masking for this project.


 The camo scheme I think I may end up using.


Monday, April 15, 2013

1500 Game - My Nurgle Chaos Marines vs Space Wolves

With an afternoon to kill due to an empty house I decided I would try and get some 40k in as I am still woefully behind in learning 6th edition.  Eight months after the fact and I still have yet to get ten games of 6th under belt.  My wife was spending the afternoon very near my local GW store so I decided to pack up my Chaos Marines and see if I could get a pickup game.  Lucky for me I was able to get a game pretty much while walking in. 

The game turned out to be a great learning experience for both of us. He was changing from playing mostly Tau to SW so he had almost as bad of a learning curve as I did.

This also was my first time using my iPad as my primary source of codex rules and army lists.  I picked up the chaos marine codex and using army builder PDFs to reduce the amount of stuff I have to carry.  It worked fantastic.  Now if I could just get a digital copy of the rulebook I wouldn't have to bring anything printed. 

We rolled up The Scouring with Hammer and Anvil deployment.   

I didn't get a great picture before deployment, but this is what it looked like after my first turn (I went first).  There was some infiltrating going on, including a unit my opponent managed to get into my deployment zone.  


 The middle of the board, where the four point objective was, was where my opponent chose to drop a unit of blood claws on turn one. 
 Some wolves got really close to me before being shot and forced to flee.

 I peeled Typhus off from his unit of plague zombies and had him charge the blood claws.  I figured his Destroyer Hive would wreck them, though it only ended up killing 3 of the 9 it hit. 
 After turn two my Heldrake came in and between vector striking and flaming wrecked the squad in the corner of my deployment one.  I also managed to chase the blood claws off.  My opponent did drop a grey hunter squad into my lines that my terminators would soon go after.
 After the next turn my Heldrake finished off the blood claws, my terminators move in towards the grey hunters and the maulerfiend charges a scout squad.
 I ended up charging Njal (a proxy) with my zombies just to tie him down.  The zombies make great tar pits, and ended up keeping him occupied for two turns due to some unlucky attack rolls.  The crow was the only thing that actually damaged the zombie unit.
 The board at the start of turn 4.  We ended up calling it.  My opponent had some really unlucky rolls, along with a bad deployment and mission for him. I think his army was a bit of a bad match up for me as he came in way too piecemeal so I could focus my fire on with multiple units to whittle a unit down and then charge in to finish them off.  The Heldrake is also a beast, he finished off the blood claws, wiped out the grey hunters in my backfield on his way in, and that was only in two turns. What a monster unit.   We both suffered from poor rules knowledge (it took 2.5 hours to do three turns) though I think we both learned a ton. 


Friday, April 5, 2013

Finished Painting Dire Troll Mauler

I finished a few more details and based up the Dire Troll Mauler.  I decided to try out a swamp basing, using a Secret Weapon Miniatures kit for my trolls.  I am not sure I am happy with it, as I've always hated the glossy look of water effects but I am giving it a shot.